Lamp-Q499
- March 06, 2014
- 2,213 Downloads
- 16 Likes
- Blender 2.7x
- Render: Cycles
- Creator: rianvermeulen
- License: CC-0
Description:
Hi,
This blend came about after a question from OD91 about how to model this lamp. (Well, it's a fashiondisplay, we make it a lamp).
Design is from Ola Shibib and the picture came from Shape Studio
Toggling the previewpictures will fake the lightswitch.(Once they're downloaded to your browser.)
Some testmodeling slowly and sneakily became a full model, so then ofcourse he made me upload and explain....See in the comments below...
Comments:
-
rianvermeulen
Edited March 06, 2014As you can see the lamp has a repeating pattern and if we swap each part with a (once divided) plane it looks like this:
The brown is the pattern, the white rims we will extrude later-on, and the dark-brown is the only part we have to model, because we will use arrays and and a circular curve.
This is a standardtechnique and if you don't know it, watch this tut from Andrew Price how to make a cartyre in blender :D
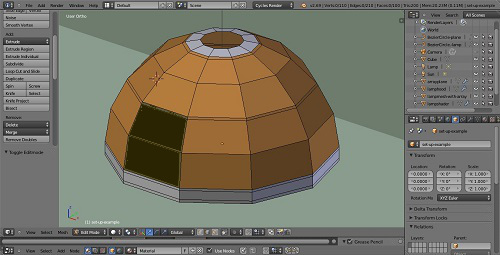
The set-up would look like this
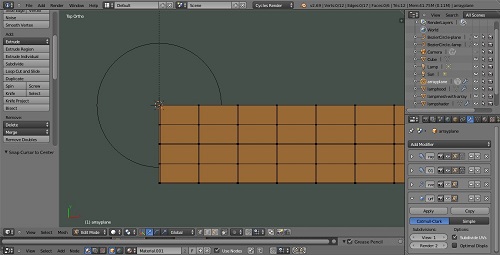
Modeling: Add the backgroundimage and a plane, subdevide 10 times (that's 10 loops, not 10 mouseclicks), delete all except the rim, select one vert, shift-D, grab and now outline the holes by extruding this one vert. Fill with planes when ready.
You will have to move the outer rim a bit. Keep in mind that the arrays have to merge later on so keep adjacent (=opposite) rims the same by only moving those verts in pairs.
The result should look like this, though less sloppy if you want a crease or a bevel. I had to remodel.
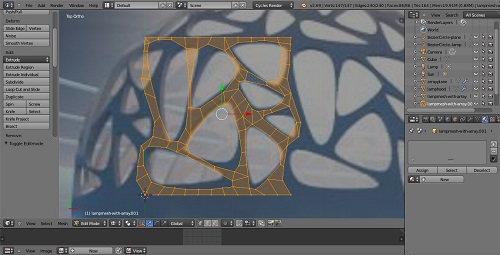
As you can see I compensated for the perspective warping by using adjacent shapes as well.
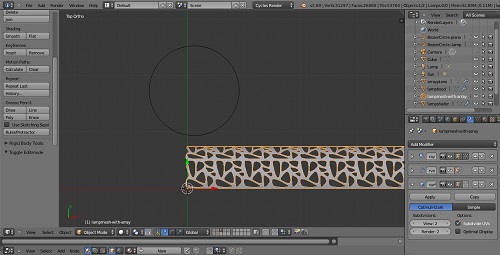
Here we add the two arrays, but if we ad the curvemodifier now we only get a cilinder. We need one more curve, and we could use another curve-mod for that, but instead we apply the vertical array straight away now, and use the warptool for that second curve.
Now I can't explain everything full scale, if you don't know this tool then read this warp transformation You'll find the tool under mesh,--- transform,---warp.
Warp some 85-ish degrees (the safe side of 90) in editmode toward what will be the inside.Things should look like this in objectmode now:(without the curve-modifier)
And like your lampshape in objectmode, when you enable the curve-mod again.
The rest is straightforward: Add solidify, subsurf, a crease or a bevel, apply the array and the curvemodifier....(unfortunately you have to because of that final seam):

The array should merge first and last too, (I think?) but it never does. You must do it by hand which means apply the curve first.
Cherio.....
-
Cesium666
Written March 15, 2014Awesome !!! It just looks like a real lamp with realistic light effect. Good tutorial as well!!
-
-
Sojan
Written May 17, 2015Nice i tried to make that effect too! cant say i did an as good job! That second preview render... exactly the scene i had a hard time lighting!
-
rianvermeulen
Written May 17, 2015Thanks, and well, I told you: It's done in the compositor.
But check it out. It's just 1MB ánd CC0.... :)
I disabled the compositor, because otherwise it would cut in on ALL the renders, but you can hook it back up easily enough, settings are still there.....
-
Sojan
Written May 17, 2015yup im ok with the compositor.... somewhat,... i think! haha i did mess around with it a little. I did not do mine in the compositor: dident think of it that way. i used ray visibility. Well that can be tweaked in the compositer to... lol
-
-
-
Dirj
Written April 09, 2014I struggled for weeks trying to accomplish this lighting effect for the Bates Mansion. I never succeeded.
-
rianvermeulen
Edited April 09, 2014Well, check it out then, that's what we're here for. :)
It's got a pleasant spartanstyle set-up: no superfluous fancy footwork, except maybe the lampshader material, but you don't need that if the lamp isn't in view.
And, (just guessing what you're after here) Like with real camera's: that shady half-lit look of the dimlight can't be accomplished by tweaking down the light-strenght. You need to properly light the scene, and then tweak brightness, contrast and saturation in the compositor... :)
-
Warcos
Written April 16, 2014woooowww amazing.... seems difficult to model but as you have done, it looks great and easy
-
rianvermeulen
Written April 16, 2014Thanks, modeling does seem difficult sometimes. Luckily with Blender we have this complete bucketfull of amazing modelingtools at our disposal. :)
-
-
-
vooccies
Written January 21, 2026Beste mede-spelers! Ik zag een tijdje terug een kleine banner op een sportwebsite en besloot gewoon eens een kijkje te nemen. Ik had net een paar rotweken achter de rug waarin werkelijk niks lukte, maar bij https://win-aura.be/ keerde mijn geluk volledig. Of het nu gaat om poker of gewoon een paar snelle bets op mijn favoriete team, het werkt allemaal erg intuïtief. Het is oprecht een van de betere plekken die ik ben tegengekomen voor spelers uit België de laatste tijd en ik vermaak me prima.


Edit 30-04-2014: Hi, I noticed that the Sampling-clamp settings in the renderpanel (version 2.69) have been split-up into "Clamp Direct" and "Clamp Indirect" in version 2.70.
However, these new settings do not copy the Clampvalue that I have set in the older version, resulting in no Clamp at all, and very noisy renders.
Now, I have updated this blend to version 2.70, but if you have the old blend and use 2.70 you have to do it manually: Clampvalue should be 3.00 for both... :)